TL;DR:
- Visual supports enable children with autism to engage independently in communication and daily routines by providing visual prompts tailored to their developmental level. These tools include boundaries, cues, and schedules, which should be simple, personalized, and consistently used across settings to promote lasting progress. Patience, prompt fading, and professional guidance are essential to overcoming common challenges and maximizing the effectiveness of visual supports.
Visual supports for autism are visual displays that help children engage independently in communication and daily routines without relying on adult prompts. According to AFIRM, these tools are specifically designed to prompt the learner directly, reducing dependence on caregivers over time. They include choice boards, picture schedules, visual cues, and boundary markers, each serving a distinct purpose. The evidence base for these tools spans ages 0 to 22, making them relevant whether your child is a toddler or a teenager. Knowing how to create visual supports for autism means understanding not just the materials, but the teaching process behind them.
How to create visual supports for autism: types and functions
Visual supports fall into three categories: visual boundaries, visual cues, and visual schedules. Each one targets a different aspect of your child’s daily experience, and using all three together creates a consistent, predictable environment that supports learning.
Visual boundaries
Visual boundaries mark physical spaces to signal where an activity begins and ends. At home, this might mean placing colored tape around a reading corner or using a placemat to define where your child sits during meals. In classrooms, teachers use shelving, rugs, and furniture arrangement for the same effect. The goal is to reduce sensory and spatial confusion so your child can focus on the task at hand.
Visual cues
Visual cues are the most varied category. They include choice boards that display two or three options for your child to select from, labels on bins and drawers, and graphic organizers that break a task into steps. A choice board showing a banana and a cracker gives your child a concrete way to communicate a preference without needing words. Labels on toy bins reduce the friction of cleanup because the expectation is visible, not verbal.
Visual schedules
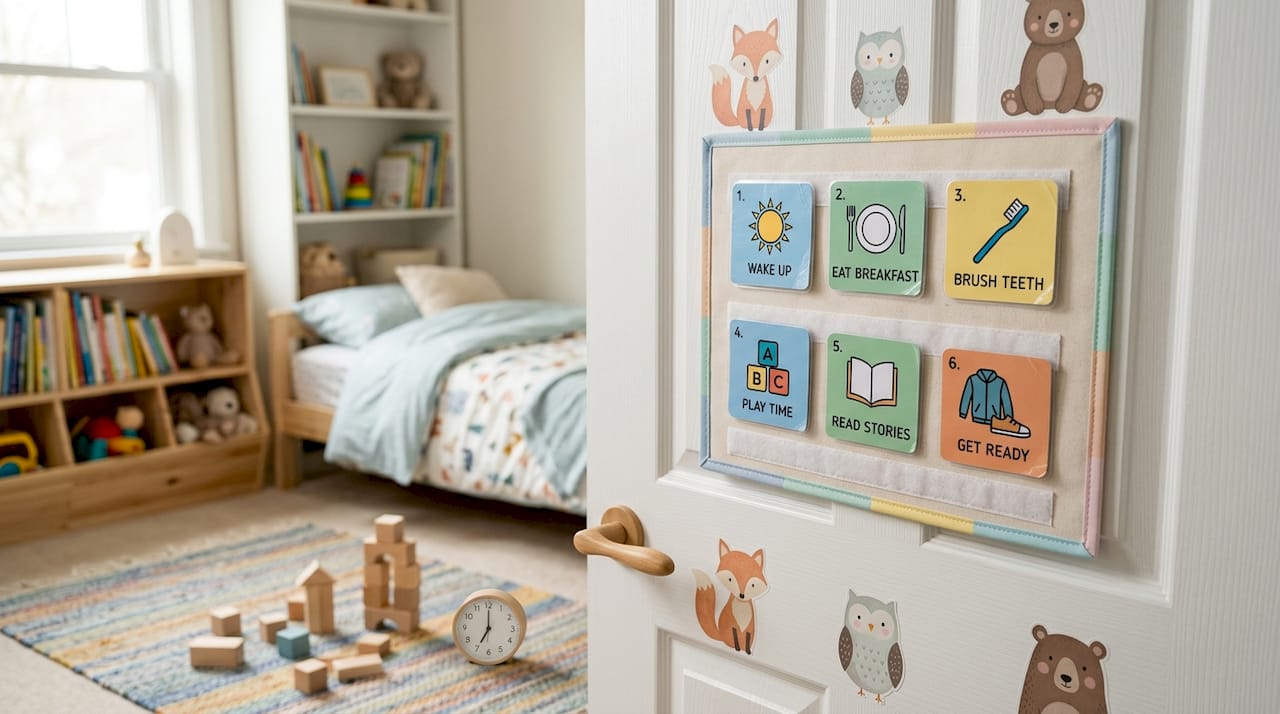
Visual schedules show the sequence of activities across a part of the day or the full day. They can use real objects, photographs, line drawings, or written words depending on your child’s developmental level. A morning schedule might show: wake up, brush teeth, get dressed, eat breakfast, and leave for school. AFIRM research notes that schedules function as both a location cue and a behavior cue. Your child should stay in the scheduled location until the visual signals it is time to transition, which prevents confusion about what comes next.

Here is a quick comparison of the three types:
| Type | Primary function | Common formats |
|---|---|---|
| Visual boundaries | Define physical activity zones | Tape, rugs, placemats, furniture |
| Visual cues | Guide communication and task steps | Choice boards, labels, graphic organizers |
| Visual schedules | Sequence activities across the day | Photos, symbols, objects, written words |
What materials do you need to make visual supports at home?
Creating visual aids for autism does not require expensive equipment. Most caregivers start with materials already in the house and build from there.
Core low-tech supplies include:
- Printer and paper for printing photos or symbol cards
- Laminator to make cards durable and reusable
- Velcro dots to attach and remove cards from a schedule board
- Binder rings to keep card sets organized and portable
- Sticky notes and whiteboards for flexible, easy-to-update cues
For digital creation, apps like Boardmaker and SymbolStix offer libraries of symbols and pre-built templates. Google Slides and Canva work well for caregivers who prefer free tools and want to incorporate real photos. Real photographs of your child’s actual food, toys, and spaces are often more effective than generic clip art because personalized images increase comprehension and engagement for many children.
Design simplicity matters more than visual polish. Keep each card to one image with a short label underneath. Avoid busy backgrounds or multiple images on one card. If your child is drawn to a specific character or color, incorporate it consistently to build recognition.
Pro Tip: Laminate two sets of every card. Keep one set on the schedule board and store the second set in a labeled zip bag. When a card gets lost or damaged, you have a replacement ready without reprinting.
Portability is worth planning for from the start. A small binder or a lanyard card ring lets you bring visual supports to the grocery store, a doctor’s appointment, or a grandparent’s house. Consistency across environments is one of the strongest predictors of success, and that only happens if the tools travel with your child.
How to implement visual supports step by step
Planning and teaching are where most caregivers need the most guidance. Having the cards is only half the work.
-
Identify one target skill or routine. Start narrow. A morning routine or a snack choice is more manageable than a full-day schedule. Trying to introduce too many visuals at once overwhelms both you and your child.
-
Choose the right format for your child’s level. Real objects work for children at the earliest developmental stages. Photographs come next, followed by line drawings and symbols, then written words. Match the format to where your child currently communicates most successfully.
-
Introduce the visual in a motivating context. Starting with food choice visuals is a proven strategy because food is immediately meaningful to most children. Place two food photos in front of your child and wait up to 10 seconds for a response before prompting. That wait time gives your child the chance to use the visual independently.
-
Position yourself behind the child, not in front. Standing behind the learner during prompting directs your child’s attention to the visual support rather than to your face or gestures. This is one of the most counterintuitive but effective techniques in the AFIRM framework.
-
Fade your prompts quickly once your child meets the criterion. Rapid prompt fading is critical. If you continue prompting after your child has demonstrated understanding, you become the controlling cue instead of the visual. The goal is for the picture or schedule to do the work, not you.
-
Communicate the system to every caregiver. Grandparents, teachers, babysitters, and therapists all need to use the same visuals in the same way. Consistent use across settings is one of the strongest factors in whether visual supports produce lasting change. Write a one-page summary of how each visual works and share it with everyone involved in your child’s care.
-
Collect simple data. Track whether your child responded independently, needed a prompt, or ignored the visual on each trial. This does not need to be complicated. A tally sheet works. Data helps you decide whether to continue, adjust the design, or try a different approach.
Pro Tip: Structured programs like TEACCH, which combine visual supports with physical environment organization, show moderate adaptive skill improvements within 6 to 12 months across communication, daily living, and social skills. Ask your child’s occupational therapist or behavior analyst whether a TEACCH-informed approach fits your home setup.
What challenges will you face and how do you fix them?
Even well-designed visual supports run into problems. Knowing the common ones in advance saves a lot of frustration.
-
Your child ignores the visual and looks at you instead. This usually means you are positioned in front of your child during prompting. Move behind them and reduce eye contact during the teaching moment. The visual needs to become the most informative thing in the environment.
-
You are prompting too often and too long. Many families unintentionally maintain adult prompts for weeks after a child has already learned the skill. Fading prompts quickly after the criterion is met prevents your child from waiting for your cue instead of using the visual. Review your data weekly to catch this pattern early.
-
Your child refuses to engage with the schedule. Check whether the activities on the schedule are motivating. If every item is a demand and none are preferred activities, the schedule signals work with no reward. Intersperse preferred activities visibly throughout the day.
-
The visual support works at home but not at school. This is almost always a consistency problem. Schedule a meeting with your child’s teacher to align on the same visuals, the same positioning strategy, and the same prompt fading plan. You can find autism-friendly classroom strategies that complement home-based visual systems.
-
Progress stalls after an initial improvement. Use your data to identify whether the visual format needs to change, whether the routine has become too predictable, or whether your child is ready to move to a more abstract format such as written words instead of photos.
Key takeaways
Effective visual supports for autism require the right type, clear design, deliberate teaching, and consistent prompt fading to build genuine independence.
| Point | Details |
|---|---|
| Three core types | Boundaries, cues, and schedules each serve a distinct function in daily routines. |
| Design simplicity wins | Use real photos, one image per card, and your child’s interests to maximize engagement. |
| Position behind the child | Standing behind the learner directs attention to the visual, not the adult. |
| Fade prompts fast | Slow prompt fading makes you the cue instead of the visual, undermining independence. |
| Consistency across settings | Every caregiver must use the same visuals the same way for progress to transfer. |
What I have learned from watching visual supports work and fail
I have reviewed hundreds of caregiver accounts and therapy notes on visual support implementation, and the single most common mistake is not a design flaw. It is prompt dependency. Caregivers create beautiful, laminated, color-coded schedules and then stand right in front of their child pointing at each card every single time. The child learns to wait for the point, not to read the schedule. The visual becomes decoration.
The counterintuitive fix is to do less. Step back. Stand behind your child. Wait longer than feels comfortable. That 10-second wait before prompting feels like an eternity when you are watching your child stare at the cards, but it is exactly the space where independence gets built.
The other thing I would tell every caregiver is to start with something your child actually wants. Food choices are not a trivial starting point. They are strategic. When the visual leads to something your child cares about, the visual becomes worth attending to. That motivation transfers. Once your child understands that pointing to a picture gets them what they want, you have a foundation to build every other routine on top of.
Patience with the process matters, but so does trusting the data. If something is not working after two weeks of consistent implementation, the answer is not to try harder. It is to look at what the data shows and adjust the design, the format, or the teaching approach. You can explore evidence-based communication strategies to find additional frameworks that complement visual supports.
— Keith
Finding professional support for your visual support journey
Creating visual supports at home is a powerful first step, and professional guidance makes the process faster and more effective. Autism therapy services can assess your child’s current communication level, recommend the right visual format, and train your whole family to implement and fade prompts correctly. Autismdoctorsearch connects you with autism therapy services that specialize in exactly this kind of structured support, including ABA therapy providers who use visual supports as a core part of their intervention. If you want a tailored plan built around your child’s specific needs, the Autismdoctorsearch directory is the fastest way to find qualified local providers. You can also explore practical growth strategies for additional caregiver-tested approaches.
FAQ
What are visual supports for autism?
Visual supports are visual displays, such as pictures, symbols, or written words, that help children with autism engage in communication and routines independently without relying on adult prompts.
What age range benefits from visual supports?
Visual supports are effective across ages 0 to 22, as documented by AFIRM, making them relevant for toddlers through young adults with autism.
How do I know which type of visual support to use?
Match the format to your child’s developmental level. Use real objects for early learners, photographs for the next stage, then line drawings, symbols, and finally written words as comprehension grows.
Why does my child ignore the visual schedule?
The most common cause is that the child has learned to wait for an adult prompt instead of reading the visual. Reposition yourself behind your child and increase the wait time before prompting to shift attention back to the schedule.
How long does it take to see results from visual supports?
Structured visual teaching programs show moderate improvements within 6 to 12 months. Individual routines with motivating contexts, like food choices, can show results within days when implemented consistently.